This facebook comment box is an upgraded version of facebook comment form which enable admin to receive notification directly into there facebook account whenever comment is been drop on your blog/site and provide a reply option. facebook developers introduce this comment box around 2009, but having some little problem in the initial days of the development, but working perfectly well now.
In this tutorial it is not compulsory you disable your blogger comment box, you can use the both comment box to provide different options to your readers commenting on your blog.
Let's Get This Applied To Your Blog/SiteSTEP 1= How to GET your Facebook App ID
- Go to facebook developers page to get your App ID
- Click "+Create New Application"
- Click "Go to App" > "+Create New App"
- A window will pop up enter your desired name and click "Continue" as shown below.
In the next window that appear, you will need to fill some box as shown in the image below.
- Enter Blogspot.com to where the red arrow is pointing.
- Enter your blog/site url to where the purple arrow is pointing, in this format http://www.howtoalltools.blogspot.com/
- Copy your App ID from where the brown arrow is pointing and paste it into a notepad.
- Click "Save Changes"
STEP 2= Adding Facebook Comment Box- Login to your blogger dashboard
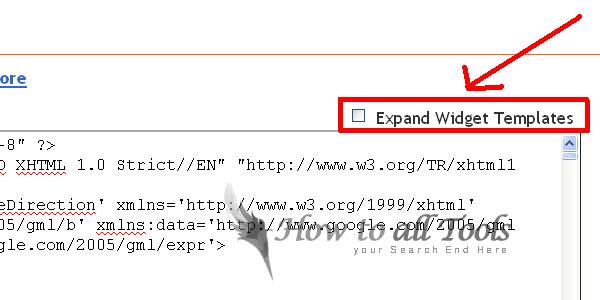
- Click on "Design" > "Edit HTML" please make sure you back up your template
- Mark/Tick "Expand Widget Template"
- Use ctrl F to find <html
- Give a space after </html tag and paste the code below after it.
xmlns:fb='http://www.facebook.com/2008/fbml'
Note : Give space at both ends of the code above.
Example: ----***
</html xmlns:fb='http://www.facebook.com/2008/fbml' ***---<div id='fb-root'/>
<script>
window.fbAsyncInit = function() {
FB.init({
appId : 'App ID',
status : true, // check login status
cookie : true, // enable cookies to allow the server to access the session
xfbml : true // parse XFBML
});
};
(function() {
var e = document.createElement('script');
e.src = document.location.protocol + '//connect.facebook.net/en_US/all.js';
e.async = true;
document.getElementById('fb-root').appendChild(e);
}());
</script>
- Replace App ID with your application id which you copied in the first step.
Find the next code
</head> and paste the code below Before/Above the
</head> tag.
<meta expr:content='data:blog.pageTitle' property='og:title'/>
<meta expr:content='data:blog.url' property='og:url'/>
<meta content='Realcombiz' property='og:site_name'/>
<meta content='Blog logo url' property='og:image'/>
<meta content='App ID' property='fb:app_id'/>
<meta content='http://www.facebook.com/Howtoalltools' property='fb:admins'/>
<meta content='article' property='og:type'/>
- Replace How To All Tools with your blog title
- Replace Blog logo url with your blog logo image url, this will appear next to your post title when you post is shared by readers.
- Replace App ID with your application id, which you copied in the first step.
- Replace http://www.facebook.com/Howtoalltools with your facebook profile url.
- Now find the code below
<div class='post-footer-line post-footer-line-1'>
Paste the code below immediately below/after the code above.
<b:if cond='data:blog.pageType == "item"'>
<div style='padding:0px 0px 0px 0px; margin:0px 0px 0px 0px;'><script src='http://connect.facebook.net/en_US/all.js#xfbml=1'/>
<div> <fb:comments colorscheme='light' expr:href='data:post.url' expr:title='data:post.title' expr:xid='data:post.id' width='520'/></div>
<div style='color:#fff; background-color:#3B5998;border: solid 1px #ddd; font-size:10px; padding:3px; width:510px;'>Facebook Blogger Plugin: Bloggerized by <b><a alt='How To All Tools' href='http://www.howtoalltools.blogspot.com/' style='text-decoration:underline; color:#fff;' target='_blank' title='Howtoalltools'>How To All Tools</a></b> Grab this Widget <b><a alt='How To All Tools' href='http://howtoalltools.blogspot.com/2012/01/facebook-comments-box-for-blogger-in.html' style='text-decoration:underline; color:#fff;' target='_blank' title='Blogger Widgets'>How To ALl Tools</a></b></div></div>
</b:if>
- To specify the type of background you want, change light above to dark, if you want a dark scheme.
- To change the comment box size, edit width='520'
- To change the footer credits size, edit width:510px
- The difference between the comment box and the footer box should not exceed or below 10px.
- Click "SAVE TEMPLATE"
Below is the preview of the two type of comment box
LIGHT COMMENT BOX
DARK COMMENT BOX
STEP 3= How To Go About The Notification The process seems to be long, don't worry we are almost there. To get notification you will need to add to some code your blog, and you will be receiving notification directly into your facebook account as shown below
Let's get this done- Login to your blogger dashboard
- Click on "Design" > "Edit HTML"
- Mark/Tick "Expand Widget Templates"
- Use ctrl F to find <b:skin><